 |
| Never mind the Dreadball figures |
Also visible in that picture is a quick and dirty movement tray I made for the Sneaky Gits. Cardboard base, cardboard lip covered in poppy seeds and a bit of filler to smooth it out: spray black, paint dark grey with a drybrush of light try and bob is your uncle.
Today, however, our main thrust of conversation here is going to be the after-effects of buying a table.
 |
| Never mind the Torchic |
In February, Sister Superior put the foot down on the very old, very shoogly and very small dining table we owned and demanded I trek out with her to Ikea to buy a new one. A cheap dining table isn't something I could get excited about... However, receiving a new object in cardboard and polystyrene packaging always has it's uses!
Before moving back to Warhammer Fantasy I wanted to knock out some more terrain pieces, and redress an imbalance in my collection. I have lots of hills, road sections and rockspires but only a few buildings, and no ruined buildings at all. This is the classic image of a 40K tabletop, but in my entire life I've only ever made one ruined building - the old "turn a polystyrne tray into a building" trick, back when it was first featured in white dwarf, and even then I never painted the damn thing up properly.
_Page_2.jpg) |
| Never mind the old scan |
Photos follow!
So, first up, I decided not to use polystyrene but cardboard. This has some disadvantages, but it is cheap and plentifully available. The Ikea table came with double-layer cardboard so something nice and sturdy to use was available. And my old "How To Make Wargames Terrain" book comes with a handy dandy example of doing just that.
_Page_1.jpg) |
| Never mind the Fire Dragon |
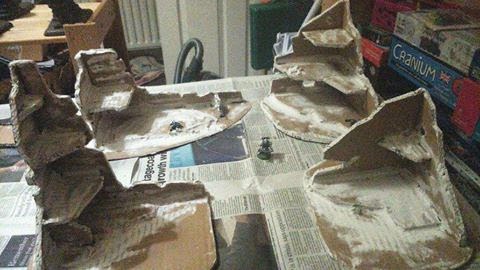
However, a wee piddly corner section a single 28mm man can hide behind.... that was never going to do. Playing with my table right now I found issues with line of sight being too good - the spires are all too narrow so only a figure or two can hide, and only at very specific angles. Today I need something more sub-sub-sub-substantial - for the same reason my last spires were bigger, this needs to be bigger too.
 |
| Never mind the poor quality picture |
Also, four sections means that they can be set up singly or in sets of 2 or 4 to create the appearance of a larger ruined building for which only corners remain.
 |
| Never mind the Cranium |
The final touches before a black spray paint were equally cheap and cheerful. Some chopped-up plastic sprue & base were put in little piles on a few places to make mounts of debris; toothpicks and drinking straws were placed jutting out of floors to create exposed steel frameworks and pipes; the base of the buildings were covered with cork dust attached via watered down PVA.
 |
| Never mind the Army Painter |
Dry brushing the concrete was done in two steps. On the left you see the first stage, with the black base drybrushed heavilly in my last vestiges Fenris Grey. This is a bluey-grey colour which.... didn't look that good in the flesh, to be honest, the whole thing was still too black.
On the right, however, you see the second step - Coat-D'Arms Elven Grey was also drybrushed on fairly liberally. The end result of the black, grey and blue mixing together gives a fairly good concrete appearance.
 |
| Never mind the scratch-build Land Raider |
All four pieces now have a messy concrete finish - hardly Golden Daemon standard, but good enough for the table. The piles of debris were either painted concretey blue/grey or metallics depending on what I thought looked good. All the exposed pipes/framework was given a metallic touch, though I'm going to go back over and dirty them up.
The final stage will be to get the cork painted to match my Mechrite Red bases. Alas, the cork hasn't stuck great and bits are flying off when I try to brush with any power. I often find this is a problem with large areas of flock, the PVA needs to be watered down to spread over the area but it's easy to water it down too much. I've given the bases a spray of matt varnish and some splashes of brown ink, hoping that'll help bind it all together.
 |
| Never mind the running joke |
No comments:
Post a Comment