So, I posted a picture of a Lego box a few days ago - to be exact, a small open-topped head made of wee Lego blocks. Whatever is this construct for, you may ask? Why, it's a mould box - because my next hobby experiment is to try casting my own figures.
This is a bit of a moral grey area - strictly speaking casting any figures would be a copyright violation. But when it's figures that are out of print and have been for years, which can only be bought on eBay for crazy money.... Well, who do I benefit by spending £15 on three
Hobgoblin Sneaky Gits or one
Squat Exo-Armour, especially when I need 20 of the former and 5 of the latter to actually field a unit? I've picked up some odds and ends on eBay for my Chaos Space Marines and Squats when it's been at a non-silly price, but it's difficult to justify paying even more than Forge World prices for this kind of stuff.
I had previously dabbled in
InstantMould to make parts - duplicate a head here, a gun there - but it's got limitations which make it impractical for anything beyond a fairly small size. If I want to dabble in copying whole figures, I gotta get some new gear.
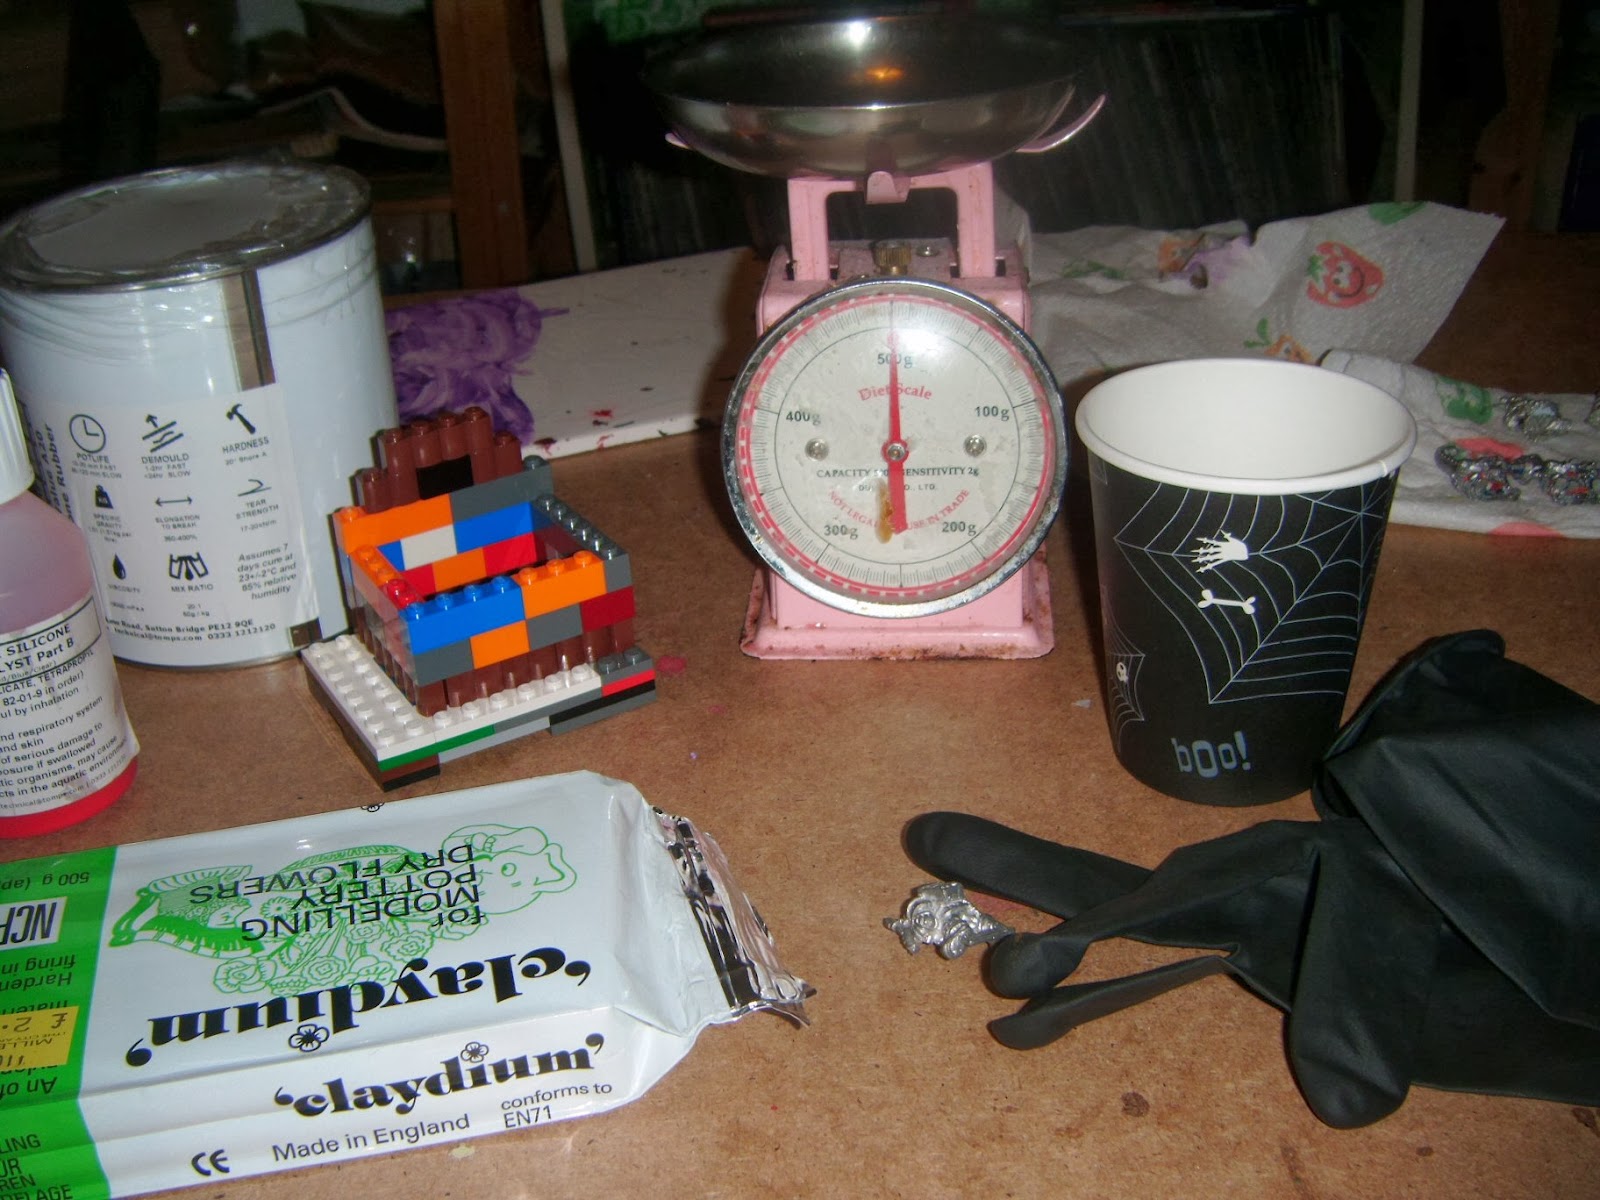 |
| The ingredients to make a mould - silicone mix, mould box, scales, paper cups, gloves, modelling clay and of course the figure in question. Not pictured - Vaseline, plastic spoon and cocktail sticks. |
Pictures is all the gear I assembled to make my mould. There are guides online for this which will go into far better detail than I: the big one that inspired me was
this PDF on the not very safe for work
1d4chan wiki. From there I discovered about TOMPS and their
RTV silicone rubber which is the heart of my mould making experiments.
The figure I'm going to try and clone is a Squat Musician rom the old Rogue Trader range. He's been out of production since the early 90s, but he'll make a fine Vox-Caster for my Imp Guard Squats - something I'd potentially want one of in every unit, but collecting them by eBay can be an adventure as it's both rare and expensive. (I was lucky and got mine for a song, but
a search on eBay shows they got for
very variable prices!) He's also quite blocky in pose and detail, so it's not a bad figure to experiment with for my first go.
 |
| The original figure, as purchased on eBay for a couple of quid. |
So, to start, the mould box was half-bedded in clay and the figure pushed in. I used cocktail sticks to make vents for air bubbles, and some plastic bits were wedged above his head to help me cut a pour hole afterwards.
The TOMPS silicone is pretty easy to use - no overpowering smell or anything. The large metal tin has the gloopy white goo which is easilly wiped up if spilled; the small plastic container has the red junior partner which helps it set. This is also hazardous, so knowing I'm a total muppet and would end up burning off my fingers or something Ailsa ensured I had a pair of gloves.
 |
| "That elusive ingredient, that spark that is the breath of life… " |
The mixture is put in 20:1 in favour of the white gloop and mixed with the aid of a plastic spoon. It needs quite well mixed to make it not streaky but a uniform pink colour.
 |
| The goo still in it's liquid, part-mixed stage. |
Unfortunately, my first effort didn't go too well. I got the first half mixed fine, and the logic goes that after it's set I pour the second half over it. To stop them sticking together I need to use some sort of oil or something to separate them out.... but first time round my attempt at using kitchen oil was a disaster and I got a single huge lump of silicone wrapped around my figure which had to be cut free. Useless!
 |
| "You can't fool me. It's silicone all the way down" |
So a second attempt was made, but hunting online for suggestions I found
another guide with a different suggestion. So, using Vaseline, I coated the face of the mould and poured silicone over...
 |
| Second time lucky! The mould straight after being split apart. |
...and it worked! The two bits of silicone set separately, creating a two part mould. The cocktail sticks and plastic bits could then be removed and their holes expanded to connect the figure and the outside world, making a nice large space I can pour silicone down and escape routes for air bubbles.
 |
| After some tidying attempts, the mould is ready for use. |
There's definitely detail on the mould - I can make out the backpack's little buttons. If it's going to be good enough for play will need to wait until I actually pour resin in and see the end result. The silicone has a rubbery form which is easy to cut with a knife but which is firm enough that the completed mould can resist the abrasions of moulding.
You will note I don't mention any fancy gear for de-airing the mould. The silicone I have, while it would prefer a vacuum machine to remove all the air bubbles and make it firmer & harder wearing, doesn't need it - it apparently de-airs itself in some lesser fashion unaided.
The total I spent on this project for the 1kg of silicone, 1kg of resin and the carriage (actually the most expensive individual part!) was £35 . I have purchased
far stupider things for that kind of money and if I can successfully clone some of the rarer figures, it should pay itself back in the long run.
I've got a game this weekend - my first 40K game of the year - so I'm not sure how much painting will take place. However, I'm definitely going to continue dabbling with making moulds, because with a bit of luck I should be able to use this to make my armies far more practical to assemble.


No comments:
Post a Comment